Mac 101: Printing (Mac OS X v10.6)
Learn about printing in Mac OS X v10.6 Snow Leopard, which is easier and better than ever.
Note: For information about printing in OS X Lion, please see this article instead.
Important: See this article for information about connecting a wireless-capable printer to your wireless network.
Here's a quick summary of what's new for printing in Snow Leopard (read below for more details):
- Apple's Software Update will automatically provide you with third-party printer software and updates.
- "Nearby Printers" is a list of available printers that will appear right inside your printer dialog box. Adding a nearby printer is just a selection away.
- You can simply connect a USB printer and the print queue will be automatically created.
- You can create a PDF document from any application and have an automated workflow process it.
Before you connect your printer
- Run Software Update to check for the latest third-party printer software and updates.
- Make sure the printer is powered on, has paper, and doesn't have any issues such as a paper jam or low ink.
- Adding, managing, or removing print queues may require an administrator account name and password--make sure you know one for your Mac.
- If you are upgrading from Mac OS X v10.5, see "Upgrading Print Queues..." in the additional information section below.
How to add a printer
To add a USB printer
Mac OS X v10.6 comes with software for many third-party printers, so simply connect a USB printer and the print queue will be automatically created. If you do not see your printer in the "Printer:" pop-up menu after connecting it, go to the "To add a printer via the Print & Fax preference pane" section below.
To add "Nearby Printers"
With Mac OS X v10.6 you can quickly add a "Nearby Printer"--a nearby printer is a printer connected to the USB port on a Time Capsule or AirPort base station, a network capable printer that supports Bonjour, or a printer being shared by another Mac. Snow Leopard uses Bonjour technology to find nearby printers.
To add a Nearby Printer, all you have to do is select the Nearby printer you want from the "Printer:" pop-up menu:
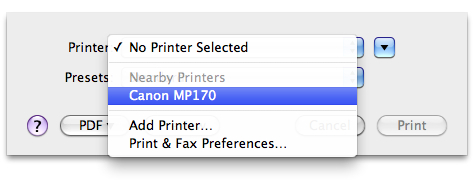
Snow Leopard will automatically create the Print Queue.
Note: Mac OS X v10.6 comes with software for
many third-party printers. If an additional or updated printer software
is available, Software Update will offer it to you. For more information
about supported printers see this article. You can also visit the printer vendor's website for printer software, or contact them for technical support.
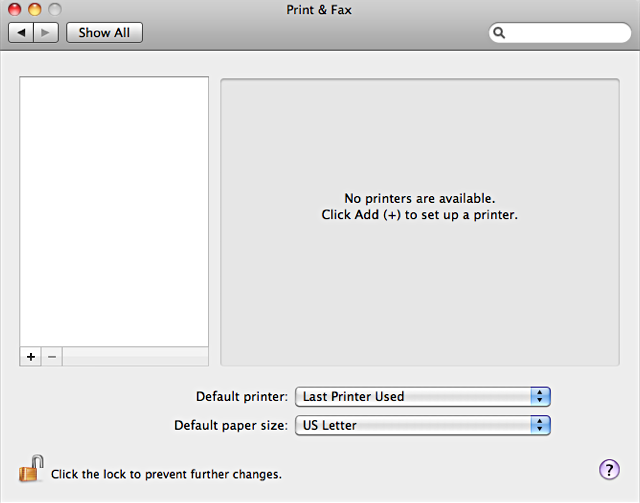
To add a printer via the Print & Fax preferences pane
Control-click the System Preferences icon in your Dock and choose "Print & Fax" from the Dock menu. If the Print & Fax lock icon appears locked, click the lock icon and enter an administrator name and password when prompted. Click the + (plus) icon below the Printers pane on the left to open the Add Printer application.
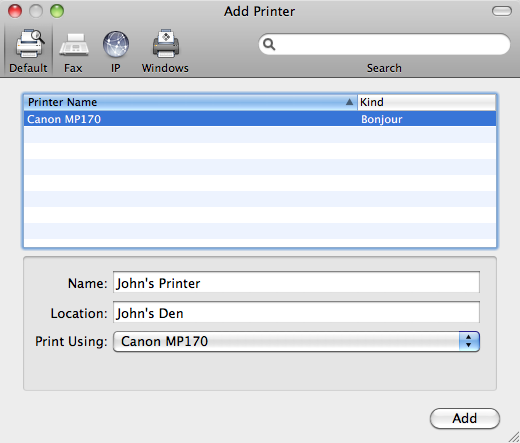
From the Add Printer toolbar you have these default tools:
- Default - Used to get a list of all printers that your Mac can see via USB, Bonjour, and so forth. Tip:
If you have a long list of printers, use the search field to find the
printer you are looking for. Just click the printer in the list
that you would like to add and Snow Leopard will add the printer driver
for you.
-
Mac OS X v10.6 comes with software for many third-party printers. If an additional or updated printer software is available, Software Update will offer it to you. If you do not see your printer listed in the "Print Using:" pop-up menu or a Generic printer driver is selected, then the printing software may not be available from Apple. For more information about supported printers see this article. You can also visit the printer vendor's website for printer software, or contact them for technical support.
-
Once the driver is set, click the "Add" button to create your Print Queue.
-
- Fax - Used to add a queue for the Fax device connected to your Mac.
- IP - Used to add your printer network printers that don't use Bonjour or are on a different network subnet from your computer. Printers that support the Internet Printing Protocol (IPP), Line Printer Daemon (LPD), and HP Jetdirect (Socket) can be added in this manner. See your printer's manual or support documentation for information about how to setup the printer to use an IP-based printing protocol.
- Windows- Used to add your printer being shared via the Windows printer sharing protocol (CIFS). Tip: See Mac 101: File Sharing for details about how to add your Mac to a Windows Workgroup. This is often needed to see Windows printer shares.
Note: Any applications that are open before you add a printer will need to be quit and re-opened, in order to see all the features of the new printer.
How to print
You can choose Print... from the File menu, or press Command-P, to print something. A printing dialog sheet such as this will appear:
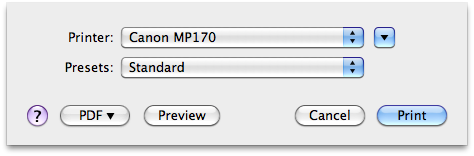
Simply click Print, or press Return, and the print job will begin.
Printing options
From the "Printer:" pop-up menu as shown above, there are the options to select or add the printer you want to print to. From the "Presets:" pop-up menu, you can select or save a preset of printer options. There is the PDF workflow menu (see PDF section below for details). You can also click the "Preview" button to preview the print out.
For more options, click the blue disclosure button (just to the right of the "Printer:" pop-up menu). The print dialog sheet will expand:
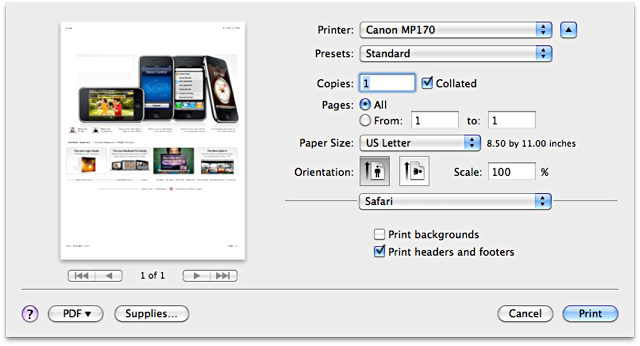
Here you can see a live preview of your print job. You can set the number of copies, select a range of pages, set your paper size, set orientation to portrait or landscape, scale the print job and choose application / printer options from the application pop-up menu (called "Safari" in this example).
Once you have selected the various printer options you like, from the
"Preset:" pop-up menu you can select "Save As..." to save those options
as a printer preset. You will be given an option to have the
preset available for all printers or just for your current
printer. In future print jobs you can enable all of those options
with the single step of selecting your saved preset from the "Preset:"
pop-up menu. You can create as many of these presets as you like.
Also from the "Preset:" pop-up menu you also have the options to
rename or delete the selected printer preset.
You can preview your print job as a PDF, or even save it as a PDF file (with metadata if you wish).
Click the "PDF ▾" button in any printer dialog box and the PDF workflow menu will drop down with these options:
- Open PDF in Preview - A generated PDF of your print job will be opened in the application Preview.
- Save as PDF... - Creates a PDF of your print job to a
destination of your choice. With options to add meta data to the
PDF (Title, Author, Subject and Keywords). This meta data can be a
big help when you use Spotlight.
- Clicking "Security Options..." button will open the PDF Security Options dialog box. Where you will have these options:
- Require password to open document
- Require password to copy text, images and other content
- Require password to print document
- Clicking "Security Options..." button will open the PDF Security Options dialog box. Where you will have these options:
- Save as PostScript... - Generates a PostScript file of your print job to a destination of your choice.
- Fax PDF - A generated PDF of your print job is sent to your Fax device for transmission.
- Mail PDF - A generated PDF of your print job is attached to a new email document. All you have to do is add recipients and send it.
- Save as PDF-X - Generates a PDF-X of your print job to a destination of your choice. PDF-X files follow a series of printing related requirements not found in standard PDFs, and are used by professional print shops.
- Save PDF to iPhoto - A generated PDF of your print job will be imported into iPhoto.
- Save PDF to Web Receipts Folder - A generated PDF of your print job will be saved to your "~/Documents/Web Receipts" folder.
- Edit menu... - Let you add / remove printing Workflows. See Automator on how to create new printing workflows.
The print queue and Dock printer icon
When you start a print job, you will see your printer icon appear in your Dock. Click the Printer icon to open the print queue, which is a list of print jobs that are printing, on hold, or paused. The print queue will also display messages sent from the printer.
You can alternatively open the print queue from the Print & Fax pane of System Preferences.
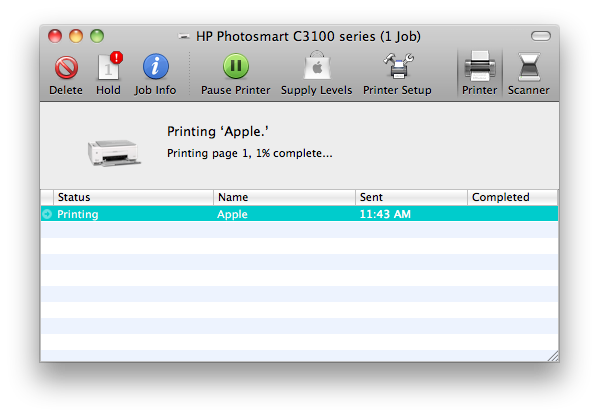
In the Print Queue toolbar you have these buttons:
- Delete - Deletes the selected print job.
- Hold / Resume - Will hold / resume the selected print job.
- Job Info - Shows details of the selected print job, such as job name, status, Completed, Job Message, and so forth.
- Pause / Resume Printer - To Pause / Resume the Print Queue.
- Supply Levels - Will drop down the Supply Levels sheet showing you the levels of ink / toner your printer has.
- Printer Setup - Lets you configure the printer's name and location details.
- Printer - Sets the Print Queue window into Printer mode.
- Scanner - Visible if you have a multi-function printer connected via USB. Click it to set the Print Queue into Scanner mode.
You can see what your print job looks like with Quick Look. Click the arrow on the print job just to the left of the Status column or select the print job and press the Spacebar.
From the Print Queue menu bar, the "Printer" menu has these additional options:
- Customize Toolbar... - Used to add and remove item from the Print Queue's toolbar.
- Make Default - Will set the printer pertaining to this Print Queue your default printer.
- Print Test Page - Will send the CUPS Printer Test Page to your printer.
- Network Diagnostics - Will bring up the Network Diagnostics application, used to check each layer of your network connection.
- Log & History - Used to open the Console application and show you the log entries for your current and past print jobs.
- Show Printer List - Will open the Print & Fax System Preference showing you the list of Print Queues.
From the Print Queue menu bar, the "Jobs" menu has these additional options:
- Show / Hide Completed Jobs - Will alternate Show / Hide in the Print Queue all completed printer jobs and completed functions, like checking the supply levels of your printer.
- Show Everyone's / My jobs - Will alternate showing Everyone's / My print jobs.
You can control-click (or right-click) your printer icon in the Dock for this convenient menu:
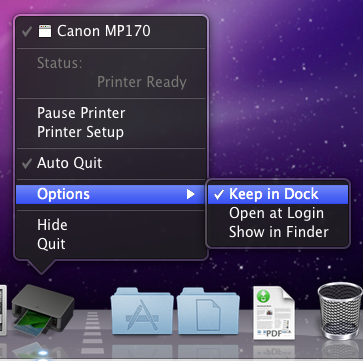
From the Dock menu you can see your printer's status, toggle Pause and Resume Printer, Auto Quit (once print job completes) on / off, and from the Options sub-menu you can toggle Keep in Dock on / off.
Print & Fax System Preferences and printer status
To open, control click or right click the System Preference Dock icon and select Print & Fax from the Dock menu.
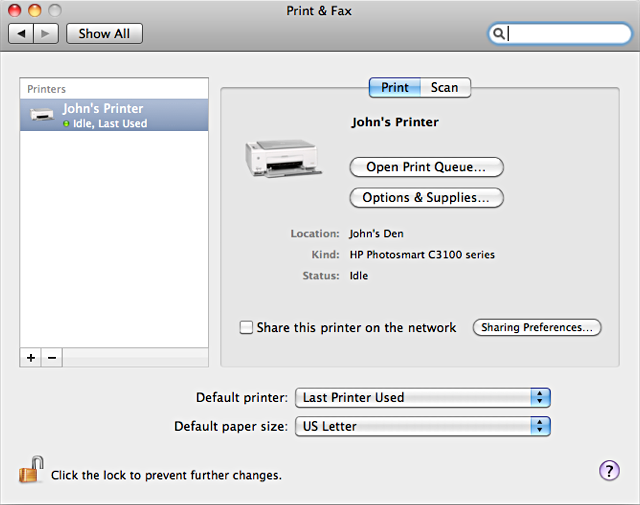
The "Printers" pane on the left side, shows you your list of Print Queues and their status. A green dot indicates no issues. A yellow dot indicates a minor issue, such as it's out of paper. A red dot indicates a significant issue, such as the printer is offline.
Clicking "Options & Supplies..." produces a sheet with these tabs:
- General - You can name your printer and enter location details. You can also see Queue Name, Driver Version and URL.
- Driver - You can assign the printer driver to your print queue and if present, driver options.
- Supply Levels - Show the level of ink / toner that your printer has.
- Utility - If present, opens the printer utility supplied by the printer vendor.
Check "Share this printer on the network" will enable your print queue to be shared. Note: If Printer Sharing is not enabled, you will be notified that Printer Sharing is off and see this icon: ![]() . See below for more printer sharing information.
. See below for more printer sharing information.
Troubleshooting steps you can use if there is an issue
Default printer menu
Last Printer Used - Mac OS X will automatically set the default printer to the last printer and preset used from the network you are connected to. This makes for a seamless default printer selection when you move from your home to your office, for example.
Or, you can select a specific printer to set as your default printer, regardless of the network you are connected to.
Default paper size menu
The default is set based on the "Region" you choose in the Formats
tab of the Language & Text preference pane. You can also
choose your default paper size from a list that is based on your printer
capabilities. |
Print Sharing
Control-click or right-click the System Preference Dock icon and select Sharing from the Dock menu.
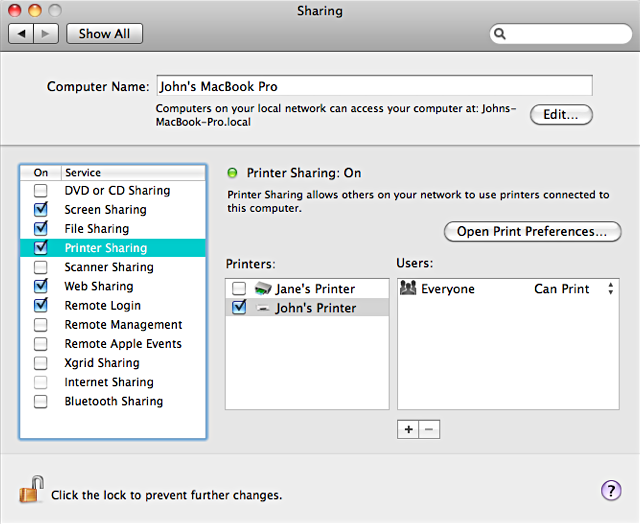
To enable printer sharing, simply check the Printer Sharing checkbox found in the Service list pane on the left.
You can choose which print queue to share by selecting its check box in the middle Printers: pane.
By default, Any user (Everyone group) can print to your shared Print Queue. If you would like to control access to your printer share, click the + (plus) button below the Users pane on the right. A users sheet will drop down, highlight one or more users or groups and click "Select" to add them. Once added, the Everyone group access will be set to "No Access".
Printer status
Mac OS X v10.6 Snow Leopard makes it easier than ever to see the status of your printers; you can even see your status in the Printer dialog box. Open the Print Queue to see details, such as messages sent from the printer.
With the printer online and ready to print, your printer dialog box and printer Dock icon will have no numbers or symbols, and the Dock menu of the printer icon will show a Status of "Printer Ready".
![]()

When your printer is online and processing a print job, the Print Queue
Dock icon will display a red number that represents the number of jobs
in the queue.

You can pause your print queue to suspend print jobs. When you do this, your printer dialog box will display an alert icon (!), and the printer's Dock icon will display a green pause icon.
![]()

If there is a message from your printer, the dialog will show an alert icon (!), and you will see a yellow message icon on your Dock. Click your printer's Dock icon to see the printer message.
![]()

If your USB printer is disconnected or powered off, your printer dialog box will display an offline icon, and the printer's Dock icon will display a yellow offline tag.
![]()

If your printer has other issues, your printer dialog box will display an alert icon (!) and the printer's Dock icon will display a red alert icon. If you are unable to resolve the printer's issue, please contact the vendor of the printer for technical support or visit the vendor's web site.
![]()

Additional Information
To delete a Print Queue
- Click the print queue you would like to remove from the list in the "Printers" pane.
- Click the - (minus) button below the "Printers" pane.
- Click "Delete Printer" in the "Are you sure..." confirmation sheet.
To reset the printing system (if necessary)
- Control-click or right-click a print queue in the "Printers" pane.
- Choose "Reset printing system..." from the contextual menu.
- Click "OK" in the "Are you sure..." confirmation sheet.
AppleTalk-based printers
AppleTalk is a protocol that is not supported in Mac OS X v10.6. Many network printers have support for IP-based printing protocols that can be used instead of AppleTalk. Please see the "To add a printer via the Print & Fax preferences pane" section for information about how to add a printer using IP. Or, visit your printer vendor's website or contact your printer vendor for technical support.
If your printer can only use the AppleTalk protocol, the printer can
be used if it is connected to, and shared by, an appropriate
AppleTalk-capable printer server. Snow Leopard can then use that
print share to print via a supported IP-based protocol. See the
"How to add a printer" section above for details about how to connect to
a shared printer to your Snow Leopard-based Mac.
Upgrading print queues from Mac OS X v10.5 Leopard
When you update from Mac OS X v10.5 to Mac OS X v10.6, Mac OS X v10.6 will replace all printer software and recreate print queues for any printer from these printer vendors:
HP, Canon, Epson, Brother, Lexmark, Samsung, Xerox, FujiXerox, Ricoh (includes Gestetner, Infotec, Lanier, NRG, Savin)
If you have a printer that is not from one of these vendors, Mac OS X
v10.6 will migrate your printer queue from Mac OS X v10.5 when you
upgrade.
If the print queue that you migrated from Mac OS X v10.5 has an issue, try these steps
- Ensure the printer is connected, has power, has ink / toner, paper, and no alerts on its built-in display.
- Network based printers should be on the same subnet; you shouldn't have to worry about this if your printer is on your home network.
- Use Software Update for the latest available updates.
- Delete the affected printer from Printer & Fax System Preferences, then re-add the printer.
If you still have an issue, try these extra steps:
- Reset the printing system (see above). Then, add the printer again.
- If the issue persists, reset the printing system (see above). Download and install printer drivers from here. Then, add the printer again.
- If the issue still persists, contact the printer vendor and/or visit their website for printer software and support.
Links
- Click here for a list of Mac OS X v10.6 Snow Leopard printer drivers
- Click here for information about troubleshooting printing issues in Mac OS X
- Click here for Printer troubleshooting for AirPort Base Stations and Time Capsule
- Click here for information about Bonjour
- Click here for information about Windows CIFS browse protocol
- Click here for information about troubleshooting Windows CIFS protocol
- Click here for HP's web site
- Click here for Canon's web site
- Click here for Epson's web site
- Click here for Brother's web site
- Click here for LexMark's web site
- Click here for Samsung's web site
 Twitter
 Facebook