The Arctic Mac
Creating .img Disk Images in OS X
I know that I'm not the only one out there who uses OS 9 once in a while. Not everyone has upgraded their software to Mac OS X, so whether you are trying to be compatible with other people, or just taking care of your own computers, it's nice to be able to support OS 9.
Of course, one of the things it'd be nice to do is to be able to still MAKE Mac OS 9 compatible disk images. That way if you have to use OS 9 to recover from a backup, you can do it. Handily, OS X can open the .img files too! However, creating them is a different story. For a long time, the only way i found was to boot up in OS 9 and make the images there. At long last I have now found a way to do it directly in Mac OS X. As is true with most things in OS X, there are two methods: GUI and CLI.
One last thing, before we begin. All this is done under OS 10.2 I sincerely hope that Apple has made the process work correctly in 10.3 or 10.4 (yet to be released) so that you can simply image a folder as an NDIF image. Until then...
GUI Method
This part essentially walks you through the making your nice image. It's really easy, and you should have no trouble whatsoever with it as long as you follow the instructions. You only have to type ONE command in the terminal, and that's only once... never again. Before you begin, as always, it's a good idea to read through the entire process before you begin. Here's the steps:
- If you've never done this before, you get to do your one step in the
terminal now. After doing this once, you can skip this step. All you
have to do is open Mac OS X's Terminal (located in
/Applications/Utilities/) and type in
defaults write com.apple.DiskCopy expert-mode 1and hit return. There. That wasn't so bad. - Now, you can go fire up Disk Copy. On the way there check to see how big your files that you want to put on the image are.
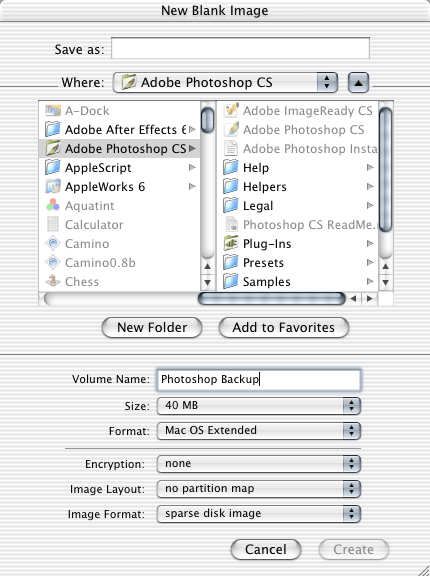
- In Disk Copy, create a new image, which should be approximately 1%
larger in size than your files(in order to make sure it's big enough).
Tell Disk Copy to make it a Sparse Disk Image(.sparseimage) with no
partition map:
- Disk Copy should create the image and mount it in the Finder for you. On my computer the system puts up an error saying something along the lines of "you have inserted a disk that Mac Os X cannot read. what do you want to do?" The ignore button seems to work well for me. Anyway, select all your files that should be on the disk image and copy them over to the disk image. Unmount the image. (If you accidentally made your image too small, I think sparse disk images are supposed to be resizable so you can try to do that if you like)
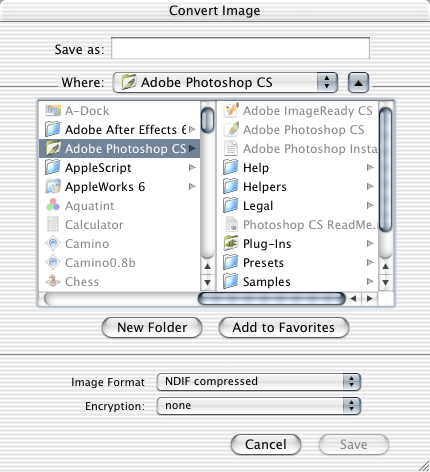
- Back in Disk Copy, select the "Convert Image..." option. Select the
sparse disk image and convert it to one of the NDIF formats (all of
them are OS 9 disk image formats). For the things I do, NDIF Compressed
is the best setting, but feel free to experiment. This is what the
convert window might look like:
- Now you get to wait for a long time while disk copy makes your image. As far as I can tell it's not any faster in OS 9, so that must just be the way it is.
- When Disk Copy finishes, you are pretty much done. You should go and delete the .sparseimage file, since you don't need it anymore. If you find that Disk Copy's expert mode drives you bonkers, you can change things back by typing "defaults delete com.apple.DiskCopy expert-mode" in the Terminal.


The Scary Part... Trying out the Terminal
Just a quick note before we start, this section is not for people who are easily intimidated, scared, or otherwise destabilized by advanced ideas. Everything in this method is in the terminal. EVERYTHING. You can even log in in console mode if you like (at the login screen, select other, and type ">console" as the username and leave the password blank. At the prompt, you can then enter your username and password. Keep in mind that the terminal gives no visual as you type a password, but it does see you typing.)
This part is also where I get to explain to you all WHY you cannot simply use Disk Copy to create the image in one go, but have instead to create a special sparseimage first and then convert that to an NDIF. The main reason is that NDIF images don't support partition maps. Apparently Disk Copy's normal mode of operation is to create a .sparseimage with a partition map(CD I think) with your files and then convert that into the final image, unless your original image is a UDIF read/write (possibly a UDIF read only). UDIF is the format of a .dmg disk image. Well, when you try to use it to image a folder to an NDIF image, Disk Copy still makes the .sparseimage the normal way, and then proceeds on to converting to an NDIF. BAM. Dead stop. You can't convert an image with a partition map to a format that doesn't support the partition map. Ouch.
Anyway, the point of all this is that if you want to make a nice NDIF, you have to do it by hand... or at least, make a .sparseimage with no partition map, and then convert it to an NDIF. Fun, fun!
- Our first step is to find out how big the disk image needs to be.
du -s imagedirectorywill return a number which is the number of 512 byte sectors in that directory. - Good. Now you know how big our first image needs to be. Let's make it:
hdiutil create -sectors number -type SPARSE -fs HFS+ -volname volumename -layout NONE imagelocation
The the number of sectors should be about 1% larger than the number thatdureturned. Give it whatever volume name and image location you'd like. - Wasn't that fun? Onward:
hdiutil mount imagelocation - now, use
cpto copy all your files into/Volumes/volname... something likecp -R ~/* /Volumes/myimage/
Note:cpdoes not duplicate resource forks, so if they're important to you, its best to useditto -rsrcor/Developer/Tools/CpMacwhichever suits your preferences and your installation better. Thanks to Rob for pointing this out. hdiutil unmount /Volumes/volnamehdiutil convert imagelocation -format imageformat -o outputfile
imagelocation is the location of the .sparseimage file and output file is the location-to-be of the .img file. imageformat should be one of:RdWr(NDIF read/write),Rdxx(NDIF read only),ROCo(NDIF Compressed),Rken(NDIF compressed, KenCode)rm sparseimagelocation
the sparse image isn't really of any use, unless you want to make another copy of the image in a different format right away, so you might as well delete it.- That's it, you're done... you've got a perfectly functional .img
file on your desktop waiting for you, provided you've typed everything
right, and your system is set up the same way as mine. Remember,
manis your friend, andhdiutilwill print out help if you just type inhdiutil verb